C#
Links
- Visual Studio
- C#
Erste Schritte mit Visual Studio
Neues Projekt, Konsole Applikation C# Starten kann man das Programm mit CTRL + F5
Klassen in C#
Beispiel für eine Main Klasse
{
public MyClass()
{
}
static void Main(string[] args)
{
MyClass c1 = new MyClass();
var c2 = new MyClass();
Console.WriteLine("Hello World");
Console.WriteLine("Press a key");
Console.ReadKey();
}
}
Mit dem Schlüsselwort var wird der Datentyp der Variable automatisch bestimmt.
Vererbung
Eine Klasse, die eine abstrakte Klasse implementiert, die zwei Interfaces implementiert.
interface PersonInterfaceA { ... }
// another interface
interface PersonInterfaceB { ... }
// abstract class
abstract class AbstractPerson : PersonInterfaceA, PersonInterfaceB { ... }
// super class Person
class Person : AbstractPerson
{
private String descE = "This is a person";
public String getDescriptionA()
{
return this.descE;
}
public virtual String getDescriptionB()
{
return this.descE;
}
}
// final class Employee
sealed class Employee : Person
{
private String descP = "This is a person which is also an employee";
// does not override the father's method
public new String getDescriptionA()
{
return descP;
}
// does override the father's method
public override String getDescriptionB()
{
return descP;
}
}
Das Schlüsselwort sealed verhindert, dass jemand von dieser Klasse erben kann.
Die Methoden
getDescriptionB()
unterscheiden sich durch das Schlüsselwort
Das hat Auswirkungen
Person p2 = new Employee();
Employee p3 = new Employee();
Console.WriteLine(p1.getDescriptionA()); // person (ok)
Console.WriteLine(p2.getDescriptionA()); // person (unexpected)
Console.WriteLine(p3.getDescriptionA()); // employee (ok)
Console.WriteLine(p1.getDescriptionB()); // person (ok)
Console.WriteLine(p2.getDescriptionB()); // employee (ok)
Console.WriteLine(p3.getDescriptionB()); // employee (ok)
Ohne virtual wird bei einer Variable vom Typ Person, die aber eigentlich eine Instanz vom Typen Employee enthält, die Methode aus der Person Klasse ausgeführt statt aus der Employee Klasse. Für Java Entwickler sicher überraschend. Die Schlüsselwörter
override
an den Methoden im Erben verdeutlichen das Verhalten noch mal.
is / as / instance of
So kann man in C# testen ob ein Objekt eine Instanz von einer bestimmten Klasse enthält
{
Father f=(Father) myobject;
}
So kann man testen und casten in einem Schritt
Das Objekt ist null, wenn der Typ nicht passend ist
public class Son : Father { }
Object o1 = new Object();
Object o2 = new Father();
Object o3 = new Son();
Father t1= o1 as Father;
Father t2= o2 as Father;
Father t3= o3 as Father;
Console.WriteLine("o1 is instance of Father? "+ (t1!=null) ); // false
Console.WriteLine("o2 is instance of Father? "+ (t2!=null) ); // true
Console.WriteLine("o3 is instance of Father? "+ (t3!=null) ); // true
Getter / Setter
Zwei Kurzschreibweisen für Getter und Setter in C#
{
private int _posX;
public int posX
{
get
{
return(_posX);
}
set
{
this._posX = value;
}
}
public int posY { get; set; }
}
Diese Aufrufe nutzen dann den Getter / Setter
p.posX = 5;
p.posY = p.posX + 3;
Exceptions
{
try
{
int zero = 0;
int c = 5 / zero;
}
catch (DivideByZeroException e)
{
Console.WriteLine("Exception: " + e);
throw e;
}
finally
{
Console.WriteLine("Exception method finished.");
}
}
Methoden
Variable Anzahl an Parametern
Eine Methode kann eine variable Anzahl an Parametern haben. Aus Performancegründen kann man trotzdem noch Varianten der Methode implementieren, die eine fixe Anzahl an Parametern haben, wenn man erwartet, dass diese Anzahl an Parametern oft benötigt wird.
{
Console.Write("Method 4: ");
for (int i = 0; i < args.Length; i++)
{
Console.Write(args[i] + ", ");
}
Console.WriteLine("");
}
public void method(String a)
{
Console.WriteLine("Method 1: "+a);
}
public void method(String a, String b)
{
Console.WriteLine("Method 2: " + a + ", " + b);
}
public void method(String a, String b, String c)
{
Console.WriteLine("Method 3: " + a + ", " + b + ", " + c);
}
Solch ein Aufruf, wählt dann automatisch die passende Methode aus:
Benannte Parameter
Man kann in C# beim Aufruf einer Method die Parameter auch über ihren Namen zuweisen, anstatt wie üblich über die Reihenfolge der Parameter. Das ist besonders interessante wenn Parameter optional sind. Hier sind z.B. age und name optional
Und so kann man beim Aufruf gezielt den mittleren Parameter auslassen
Call by reference
In C# kann man auch Basistypen mit call by reference an eine Methode übergeben
public void initValues(out int v1, out int v2)
{
v1 = 42;
v2 = 11;
}
// call by copy
public void swapValuesA(int v1, int v2)
{
int tmp = v1;
v1 = v2;
v2 = tmp;
}
// call by reference, ingoing variables need to be initialized
public void swapValuesB(ref int v1, ref int v2)
{
int tmp = v1;
v1 = v2;
v2 = tmp;
}
So werden die Methoden dann aufgerufen
int x, y;
// this would not work, not initialized
//swapValuesB(ref x, ref y);
// passing them by out however works
initValues(out x, out y);
// if not passed via reference, the values are copied and not changed
swapValuesA(x, y);
// this will work
swapValuesB(ref x, ref y);
internal / internal protected
internal
Zugriff für alle Objekte die im selben Assembly gelandet sind.
internal protected
Zugriff für alle Objekte, denen interal oder protected Zugriff gewährt würde.
Innere Klassen
In C# sharp haben innere Klassen keine automatische Referenz auf die äußere Klasse (wie das z.B. in Java ist). Man muss sich also selbst um eine solche Referenz kümmern. Siehe auch C# nested classes are like C++ nested classes, not Java inner classes
class MyOuterClass
{
private int myOuterValue = 42;
// factory method to get a new inner class with a reference to the outer class
public MyInnerClass getNewInnerClass()
{
return new MyInnerClass(this);
}
// inner class
public class MyInnerClass
{
private static int myInnerValue = 4;
// reference to the outer class
MyOuterClass _outerClass;
// contructor which sets the reference to the outer class
public MyInnerClass(MyOuterClass pOuterClass)
{
_outerClass = pOuterClass;
}
// test access to the outer class
public int foo()
{
// Does work in Java, but not in C#
//int result = myOuterValue + myInnerValue;
// Works in both Languages
int result = _outerClass.myOuterValue + myInnerValue;
return result;
}
}
}
// create an outer class, than an inner class for it
MyOuterClass outer = new MyOuterClass();
MyOuterClass.MyInnerClass inner = new MyOuterClass.MyInnerClass(outer);
// use the factory method to create an inner class for an outer class
MyOuterClass.MyInnerClass inner2=outer.getNewInnerClass();
Konstruktoren
Auch in C# haben Klassen offenbar automatisch einen parameterlosen Konstruktor.
Mit dem Schlüsselwort : base() kann ein Konstroktur einer Vaterklasse aufgerufen werden:
{
protected String name;
protected int price;
public Vehicle(String pName, int pPrice)
{
this.price = pPrice;
this.name = pName;
}
}
class Car : Vehicle
{
private Boolean automatic;
// implicit call to the parent's constructor
public Car(String pName, int pPrice, Boolean pAutomatic) : base(pName, pPrice)
{
this.automatic = pAutomatic;
}
public override string ToString()
{
return "Car " + this.name + ", Price " + this.price + " Automatic: " + this.automatic;
}
}
Static Block
{
private static int objectCounter;
// static init block, static { ... } in Java
static Foo()
{
Console.WriteLine("Init static block ...");
objectCounter = 0;
}
// normal constructor
public Foo()
{
Console.WriteLine("Create new object ...");
objectCounter++;
}
}
...
var f1 = new Foo();
var f2 = new Foo();
var f3 = new Foo();
Ausgabe
Create new object ...
Create new object ...
Create new object ...
const, readonly
Mit const kann man verhindern, dass Basistyp Variablen nach der ersten Initialisierung noch mal geändert werden.
{
public const int STARTVALUE = 42;
public int myValue;
public MyContainer()
{
// const prevents this
// STARTVALUE = 3;
myValue = STARTVALUE;
}
}
Für nicht Basistypen hilft das allerdings nicht. Dafür gibt es readonly, welches Zuweisungen auch Variablen außerhalb des Konstruktors verhindert. Der Inhalt von nicht Basistypen kann über entsprechende Methoden aber weiterhin noch geändert werden.
{
const MyContainer mc = new MyContainer();
readonly MyContainer mc2;
public TestMyContainer()
{
mc2 = new MyContainer();
}
public void foo()
{
// const does not prevent this as mc is no basic type
mc = new MyContainer();
mc.myValue = 3;
// readonly prevents this outside the constructor
//mc2 = new MyContainer();
// but this is still allowed
mc2.myValue = 3;
}
}
Bedingungen
Bedingungen z.B. in if Anweisungen akzeptieren nur noch echte boolschen Ausdrücken
// ok, boolean expression
if (a == 0)
{
}
// error, a is no boolean expression
else if (a)
{
}
else
{
}
while (a == 0) { }
// error
while (a) { }
switch Blöcke
Switch Blöcke können auch mit Strings umgehen, jedes Case Statement, welches Code enthält, muss mit return oder break abgeschlossen werden. Ansonsten muss mit goto gezielt der nächste case Abschnitt benannt werden.
{
// each case statement has to be finished by a break, a return statement or a goto statement
case "Z":
result = 3;
break;
// several case statements can be group if only the last one contains code
case "X1":
case "X2":
case "X3":
result = 1;
break;
// this is not allowed
case "Y1":
result = 3;
case "Y2":
result = result + 1;
// but you can use goto
case "G1":
result = 50;
goto case "G2";
case "G2":
result = result + 1;
break;
default:
result = 99;
break;
}
Datentypen
Mit @ vor einer String Konstanten kann man verhindern, dass der Inhalt des String irgendwie interpretiert wird (verbatim string literal).
Container
Arrays
int[] prime1 = { 2, 3, 5, 7, 11 };
int[] prime2 = new int[5] { 2, 3, 5, 7, 11 };
// more than one dimension
char[,] chess = new char[8, 8];
chess[0, 0] = 'r';
// normal for loop
for (int i = 0; i < prime1.Length; i++)
{
Console.WriteLine("Position: "+i + " value: " + prime1[i]);
}
// foreach
foreach (int curPrime in prime1)
{
Console.WriteLine("Value: {0}", curPrime);
}
Liest man über das Ende eines Arrays hinaus erhält man eine
Indexern
Eigene Objekte wie ein Array durchlaufen können
{
...
public int this[int index]
{
get
{
...
}
set
{
...
}
}
...
}
Iteratoren
{
String[] people = { "Frank", "Joe", "Jane" };
public System.Collections.IEnumerator GetEnumerator()
{
// list all values the iterator will walk through
foreach (String s in people)
{
// yield is a special keyword here, this is no real return statement
yield return s;
}
}
}
...
Foo f=new Foo();
foreach (String s in f)
{
Console.WriteLine(s);
}
enum
{
RED = 1 ,
GREEN = 2,
BLUE = 4
}
Listen
...
List<int> list = new List<int>();
list.Add(3);
list.Add(5);
list.Add(7);
for(int i=0; i<list.Count; i++)
{
Console.WriteLine(i + ": "+ list.ElementAt(i));
}
foreach (int p in list)
{
Console.WriteLine(p);
}
Reflection
So kann man für eine Klasse alle Methoden per Reflection ermitteln.
Foo.Bar.A.Class.Of.You x;
Type myType =(typeof(Foo.Bar.A.Class.Of.You));
// get the method names
MethodInfo[] methodInfos = myType.GetMethods(BindingFlags.Public | BindingFlags.Instance);
// sort them
Array.Sort(methodInfos, delegate(MethodInfo methodInfo1, MethodInfo methodInfo2) {
return methodInfo1.Name.CompareTo(methodInfo2.Name);
});
// get a string with their names
string allMethodNamesInString="Your methods: ";
foreach (MethodInfo methodInfo in methodInfos) {
allMethodNamesInString+=methodInfo.Name+", ";
}
TextBox_PMhead.Text=allMethodNamesInString;
MessageBox.Show(allMethodNamesInString);
LINQ
LINQ (Language Integrated Query) ist eine Abfragesprache innerhalb von C#
int[] ages = new int[] { 12, 18, 19, 20, 40, 69, 18, 47, 59, 61, 60, 100 };
// define a query
IEnumerable<int> myQuery = from oneAge in ages where ( oneAge >= 18 && oneAge < 60 ) orderby oneAge select oneAge;
// walk through the results
foreach (int x in myQuery)
{
Console.WriteLine(x);
}
Operatoren überladen
{
public int myValue;
public Foo(int pValue)
{
myValue = pValue;
}
// define our own + operator
public static Foo operator +(Foo op1, Foo op2)
{
Foo result = new Foo(op1.myValue + op2.myValue);
return result;
}
}
...
Foo f1 = new Foo(42);
Foo f2 = new Foo(8);
Foo f3 = f1 + f2;
C# Java Properties
sind ein sehr verbreitetes Konzept, um in Java ein Programm über eine Konfigurationsdatei zu parametrisieren. In C# gibt es ein abweichendes Konzept. Hier kann man in Visual Studio in der Baumansicht des Projektes die Settings in der GUI verändert. Diese werden in einer Datei Settings.settings gespeichert und stehen in der Anwendung direkt zur Verfügung. Angenommen eine Property heißt FOO dann kann man ihren Wert mit
auslesen. Im bin/release Ordner findet man dann eine .config Datei mit allen Settings.
DateTime
Aus einem String Zahlen ausschneiden, daraus ein DateTime generieren, eine Minute aufaddieren, und wieder einen String aus dem Datum erzeugen
pHHMM=2359
int year = Convert.ToInt32(pYYMMDD.Substring(0, 2))+2000;
int month= Convert.ToInt32(pYYMMDD.Substring(2, 2));
int day = Convert.ToInt32(pYYMMDD.Substring(4, 2));
int hour = Convert.ToInt32(pHHMM.Substring(0, 2));
int minutes = Convert.ToInt32(pHHMM.Substring(2, 2));
DateTime date1 = new DateTime(year, month, day, hour, minutes, 0);
DateTime date2 = date1.AddMinutes(1);
date2.ToString("yyMMdd HHmm");
Aus einem Datum Informationen ausschneiden
DateTime date2;
...
date2 = DateTime.Now;
int month = date2.Month;
Boolean sameDay = ( date1.Date == date2.Date );
Office-Entwicklung mit Visual Studio 2010 (VSTO), eigener Excel Ribbon
So kann man mit Visual Studio 2010 Professional (VSTO) ein eigenes Ribbon für Excel erstellen
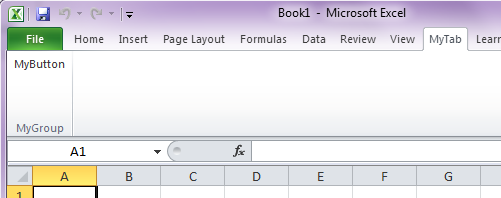
und mit entsprechender Programmlogik versehen.
Siehe auch
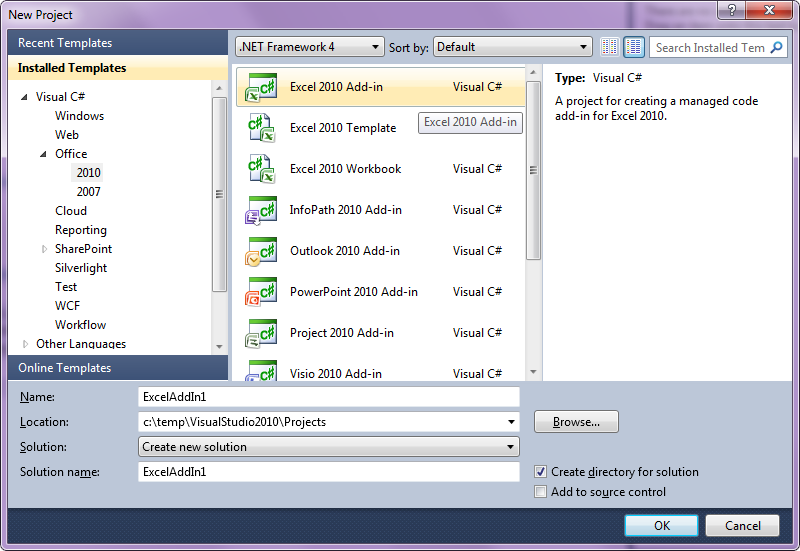
Visual Studio 2010 öffnen, New Project, Visual C#, Office, 2010, Excel 2010 Add-in.
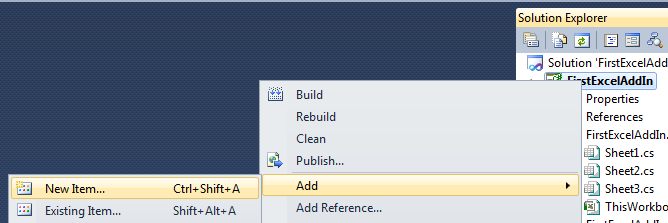
Dann im Solution Explorer über das Kontextmenü ein neues Item einfügen: Ribbon (Visual Designer)
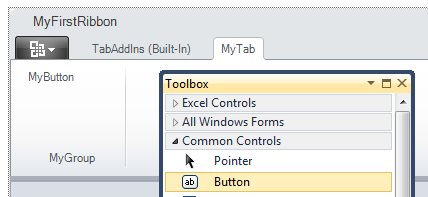
In den Ribbon erstellt man dann einen Ribbon Tab und in diesen Tab zieht man dann aus der Toolbox erst eine Group und dann einen Button in die neue Group
Den Button doppelklicken, dann öffnet sich ein Fenster mit dem Quellcode der Methode, die aufgerufen wird, sobald der Button gedrückt wird. Diese kann man dann enstsprechend abändern:
using System.Collections.Generic;
using System.Linq;
using System.Text;
using System.Windows.Forms;
using Microsoft.Office.Tools.Ribbon;
using Microsoft.Office.Interop.Excel;
namespace ExcelAddIn1
{
public partial class Ribbon1
{
private void Ribbon1_Load(object sender, RibbonUIEventArgs e)
{
}
private void button1_Click(object sender, RibbonControlEventArgs e)
{
var excel = Globals.ThisAddIn.Application;
var activeSheet = (Worksheet)excel.ActiveSheet;
var cell = activeSheet.Range["C4", Type.Missing];
MessageBox.Show("This is the value of C4: "+cell.Value2);
}
}
}
Startet man die Anwendung, findet man in Excel dann einen neuen Tab mit unserem neuen Button:

Kommt beim Ausführen folgender Fehler ...
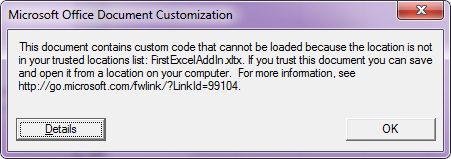
... liegt das Projekt vermutlich auf einem Netzlaufwerk.
VSTO Addin Outlook 2013
Falls in Outlook der eigene Ribbon nirgends erscheint, "RibbonType" muss auf "Microsoft.Outlook.Explorer" gesetzt werden.
Von Excel gesperrte Anwendung wieder aktivieren
Sollte es während der Ausführung des Add-Ins zu Problemen kommen, kann es passieren, dass das Programm von Excel auf einer Blackliste landet. So kann man es danach wieder aktivieren: Excel -> File -> Options -> Add-Ins https://www.tgunkel.de/it/software/doc/../../../it/software/doc/CsharpDotNet/ExcelUnBlock"Excel unlock C# Ribbon"
Beispiel Code VSTO Excel
Das aktuelle Excel Sheet mit dem wir arbeiten wollen
/// </summary>
protected Worksheet excelSheet=(Worksheet) Globals.ThisAddIn.Application.ActiveSheet;
Zugriff auf die benutzen Zellen in Excel
/// Every Execl sheet has a 2d array with the cells that are in use.
/// This returns the highest number of rows this array has
/// </summary>
/// <returns>Highest number of rows in use</returns>
protected int getMaxRows()
{
return excelSheet.UsedRange.Rows.Count;
}
/// <summary>
/// Every Execl sheet has a 2d array with the cells that are in use.
/// This returns the highest number of columns this array has
/// </summary>
/// <returns>Highest number of columns in use</returns>
protected int getMaxCols()
{
return excelSheet.UsedRange.Columns.Count;
}
/// <summary>
/// This reads cell pRow, pCol from the array of used cells the worksheet and returns it as a range
/// </summary>
/// <param name="pRow">Row</param>
/// <param name="pCol">Column</param>
/// <returns>Cell pRow / pCol</returns>
protected Range getCellAsRange(int pRow, int pCol)
{
Range currentCell = (Range)excelSheet.UsedRange[pRow, pCol];
return currentCell;
}
/// <summary>
/// Read a row into an array
/// </summary>
/// <param name="row">Your row number</param>
/// <returns>The row as an array</returns>
protected Range[] getRowAsArray(int row)
{
if (row > getMaxRows())
{
return new Range[0];
}
//Range rngUsed = excelSheet.UsedRange;
Range[] thisRow = new Range[getMaxCols()];
for (int col = 1; col <= getMaxCols(); col++)
{
Range currentCell = getCellAsRange(row, col);
thisRow[col - 1] = currentCell;
}
return thisRow;
}
/// <summary>
/// Return the header cell which contains your String
/// </summary>
/// <param name="pHeaderText">The String</param>
/// <returns>The cell</returns>
protected Range getHeaderCell(String pHeaderText)
{
Range[] firstRow = getRowAsArray(1);
foreach (Range r in firstRow)
{
String headerValue = r.Value2;
if (headerValue!=null && headerValue.Equals(pHeaderText))
{
return r;
}
}
return null;
}
/// <summary>
/// Search for the header cell with your String and changes its value
/// to your second string
/// </summary>
/// <param name="pOldValue">String to be replaced</param>
/// <param name="pNewValue">Replacement string</param>
/// <returns>true if we found a header cell with your String and replaced it</returns>
protected bool renameHeaderCell(String pOldValue, String pNewValue)
{
Range oldCell = getHeaderCell(pOldValue);
if (oldCell != null)
{
oldCell.Value2 = pNewValue;
return true;
}
return false;
}
Eine neue (leere) Spalte oder Zeile einfügen
/// Insert an empty column before your position
/// </summary>
/// <param name="pPosition">Your position (used column number)</param>
/// <param name="pNewColumnName">The column header of your new column</param>
protected void addEmptyColumnBeforeYourPosition(int pPosition, String pNewColumnName)
{
// get the column which will be behind the new column
Range firstRowAtPosition=getCellAsRange(1, pPosition);
Range entireColumn=firstRowAtPosition.EntireColumn;
// insert the new column
entireColumn.Insert(XlInsertShiftDirection.xlShiftToRight, false);
// get the new column (we use Cells here and not UsedCells as the new column is not yet in use)
Range newColumn = excelSheet.Cells[1, pPosition];
newColumn.Value2 = pNewColumnName;
}
/// <summary>
/// Insert an empty row before your position
/// </summary>
/// <param name="pPosition">Your position (used row number)</param>
protected void addEmptyRowBeforeYourPosition(int pPosition)
{
// get the row which will be below the new row
Range firstRowAtPosition = getCellAsRange(pPosition, 1);
Range entireRow = firstRowAtPosition.EntireRow;
// insert the new row
entireRow.Insert(XlInsertShiftDirection.xlShiftDown, false);
// get the new row (we use Cells here and not UsedCells as the new row is not yet in use)
Range newRow = excelSheet.Cells[pPosition, 1];
// write any not empty value in the new row so the Array UsedRange will contain the row
newRow.Value2 = " ";
}
Leere Zellen, Zeile oder Spalten finden und löschen
/// Test if a cell / range is empty be reading its value
/// </summary>
/// <param name="pCell">Your cell / range</param>
/// <returns>True if empty, false if not</returns>
protected bool isEmptyCell(Range pCell)
{
if (pCell == null) return true;
if (pCell.Value2 == null) return true;
if (pCell.Value2.ToString() == "") return true;
return false;
}
/// <summary>
/// is row number rowNr in the array of used cells an empty row?
/// </summary>
/// <param name="rowNr">Row number</param>
/// <returns>Is this an empty row</returns>
protected bool isEmptyRow(int rowNr)
{
//Range currentCell = getCellAsRange(rowNr, 1);
//Range currentRow = currentCell.EntireRow;
//return isEmptyCell(currentRow);
for (int c = 1; c <= getMaxCols(); c++)
{
Range currentCell = getCellAsRange(rowNr, c);
if (!isEmptyCell(currentCell))
{
return false;
}
}
return true;
}
/// <summary>
/// is this an empty column?
/// </summary>
/// <param name="colNr">Your column number</param>
/// <param name="skipHeader">If true a column where there is only one value in the first row will still be considered as empty</param>
/// <returns>True if this row is empty, false otherwise</returns>
protected bool isEmptyColumn(int colNr, bool skipHeader)
{
int startRow = 1;
if (skipHeader) startRow = 2;
for (int r = startRow; r < getMaxRows(); r++)
{
Range currentCell = getCellAsRange(r, colNr);
if (!isEmptyCell(currentCell))
{
return false;
}
}
return true;
}
/// <summary>
/// Remove all columns which are empty
/// </summary>
protected void dropEmptyColumns()
{
for (int col = getMaxCols(); col > 0; col--)
{
if (isEmptyColumn(col, false))
{
getCellAsRange(1, col).EntireColumn.Delete();
}
}
}
Bei wirklich riesigen Excelsheets kann das zeilenweise Untersuchen und Löschen allerdings spürbar lange dauern. Eine Möglichkeit ist dann, das Excelsheet zu sortieren, dann sind die leeren Zeilen alle am Ende. Jetzt muss man nur noch herausfinden, wo der Bereich der leeren Zeilen anfängt und man kann den ganzen Block auf einmal löschen.
/// On a sorted sheet where the empty lines are at the bottom, this will remove all the empty lines
/// </summary>
protected void removeBlankLines()
{
int lastRowNr = getMaxRows();
// empty worksheets are ok
if (lastRowNr < 1) return;
// we require the sheet to be sorted ascendending, so the empty rows should be at the end of the file
// if the last line is not empty, we're done
if (!isEmptyRow(lastRowNr))
{
return;
}
// this is the first row which
int minRowEmpty;
// if the first row is not empty, we have to delete everything
if (isEmptyRow(1))
{
minRowEmpty = 1;
}
else
{
// search for the minimum empty row
int middle = getMiddle(1, lastRowNr);
minRowEmpty = removeBlankLines_findMinRowEmpty(middle, 1, lastRowNr);
}
//Range delme = excelSheet.get_Range(min, max);
//delme.EntireRow.Delete();
for (int r = getMaxRows(); r >= minRowEmpty; r--)
{
getCellAsRange(r, 1).EntireRow.Delete();
}
}
/// <summary>
/// Find the middle between two positions.
/// If there is no exact middle, take the one with the samller id
/// </summary>
/// <param name="min">min pos</param>
/// <param name="max">max pos</param>
/// <returns>the middle pos</returns>
protected int getMiddle(int min, int max)
{
int middle = max - min;
middle = middle / 2;
middle = min + middle;
return middle;
}
/// <summary>
/// The method can only operate on a sorted sheet, where the empty lines are at the bottom of the file!
///
/// This method expects:
/// - the max know row which is not empty
/// - the min known row which is empty
/// - a row to check which is between the other ones
///
/// It returns the min row which is still empty
/// </summary>
/// <param name="rowToCheck">The row to be checked</param>
/// <param name="maxRowNotEmpty">The max known row which is not empty</param>
/// <param name="minRowEmpty">The min known row which is empty</param>
/// <returns>The min row which is still empty</returns>
protected int removeBlankLines_findMinRowEmpty(int rowToCheck, int maxRowNotEmpty, int minRowEmpty)
{
// check if the to be checked row is empty
if (isEmptyRow(rowToCheck))
{
// the range will not improve, return the best result found
if (minRowEmpty <= rowToCheck) return minRowEmpty;
minRowEmpty = rowToCheck;
}
else
{
// the range will not improve, return the best result found
if (maxRowNotEmpty >= rowToCheck) return minRowEmpty;
maxRowNotEmpty = rowToCheck;
}
// next check this one
int middle = getMiddle(maxRowNotEmpty, minRowEmpty);
// recursion
return removeBlankLines_findMinRowEmpty(middle, maxRowNotEmpty, minRowEmpty);
}
Duplikate einer Zeile finden
/// Check if two rows have the same content
/// The second row is provided as an array
/// so you can cache it and avoid re reads
/// </summary>
/// <param name="rowA">Your row number</param>
/// <param name="rowBAsArray">The other row as an array</param>
/// <returns>True if the have the same content</returns>
protected bool isDuplicateRow(int rowA, Range[] rowBAsArray)
{
for (int c = 1; c <= getMaxCols(); c++)
{
Range cellA = getCellAsRange(rowA, c);
Range cellB = rowBAsArray[c - 1];
// if one cell differs the whole line can not be equal
if (cellA.Value2 != cellB.Value2)
{
return false;
}
}
// if we reach here the whole line is equal
return true;
}
Besteht diese Zelle aus 3 Großbuchstaben
/// Check if this cell consists of 3 upper case letters (like a ISO currency code)
/// </summary>
/// <param name="pCell">The cell to be tested</param>
/// <returns>True if it looks like a currency</returns>
protected bool is3LetterCharacterField(Range pCell)
{
if(isEmptyCell(pCell))
{
return false;
}
else
{
String cellValue=pCell.Value2.ToString();
if (cellValue.Length != 3)
{
return false;
}
else
{
bool characterOnly=Regex.IsMatch(cellValue, @"^[A-Z]+$");
return characterOnly;
}
}
}
Die Spaltenbreite und Zeilenhöhe automatisch anpassen
/// Set the cell width and cell height to autofit
/// </summary>
protected void autofit()
{
getCellAsRange(1, 1).EntireRow.EntireColumn.AutoFit();
getCellAsRange(1, 1).EntireColumn.EntireRow.AutoFit();
}
Zusammengefasste Zellen trennen
/// Unmerge all cells in the sheet
/// </summary>
protected void doUnMergeAllCells()
{
Range rngUsed = excelSheet.UsedRange;
rngUsed.UnMerge();
}
Sortieren
/// Sort the whole sheet ascendening, excluding the header line
/// </summary>
protected void sortSheet()
{
// first cell under the header line
Range firstCell = excelSheet.Cells[2, 1];
// last cell in the last row
Range lastCell = excelSheet.Cells[getMaxRows(), getMaxCols()];
// all but the header row
Range all = excelSheet.get_Range(firstCell, lastCell);
// sort
all.Sort(all.Columns[1, Type.Missing], Microsoft.Office.Interop.Excel.XlSortOrder.xlAscending);
}
Updates der Excel GUI deaktivieren
/// For long running operations you can disable the screen updating
/// and hope for better performance
/// </summary>
/// <param name="yes">Disable screen updating?</param>
protected void setScreenUpdating(bool yes)
{
Globals.ThisAddIn.Application.ScreenUpdating = yes;
}
Dateiauswahl Dialog
/// let the use choose a file
/// </summary>
/// <returns>The filename of the first file the user selected</returns>
private String getFileFromUser()
{
// Which file to open?
Microsoft.Office.Core.FileDialog fileDialog = this.application.get_FileDialog(Microsoft.Office.Core.MsoFileDialogType.msoFileDialogOpen);
if (fileDialog.Show() != 0)
{
Microsoft.Office.Core.FileDialogSelectedItems selectedItems = fileDialog.SelectedItems;
foreach (String fileName in selectedItems)
{
// we only take the first filename
return fileName;
}
}
return null;
}
Eine Datei mit fester Spaltenbreite importieren
// US
int orgin = 437;
// start at first row
int startRow = 1;
// our import file has a fixed width format
XlTextParsingType fileParseFormat = XlTextParsingType.xlFixedWidth;
// the field definitions
int[,] fieldInfo2 = new int[5, 2] { { 0, (int) XlColumnDataType.xlGeneralFormat},
{26, (int) XlColumnDataType.xlTextFormat},
{56, (int) XlColumnDataType.xlSkipColumn},
{73, (int) XlColumnDataType.xlMDYFormat},
{74, (int) XlColumnDataType.xlGeneralFormat}
};
// open and parse file
this.application.Workbooks.OpenText(Filename: filename, Origin: orgin, StartRow: startRow, DataType: fileParseFormat, FieldInfo: fieldInfo1);
NHibernate
Hibernate in für C#
Links
- NHibernate
- NHibernate Download
- Oracle ODP.NET
- Tutorials
- Your first NHibernate based application
- NHibernate Tutorial
NHibernate C# Tutorial
Angenommen, wir hätten auf einer Oracle Datenbank bereits folgende Struktur angelegt:
create table MyUser.person (id number primary key, name varchar2(255), citycode number references MyUser.city(cityid) );
insert into MyUser.city (cityid, cityname) values (1, 'New York');
insert into MyUser.city (cityid, cityname) values (2, 'Frankfurt')
insert into MyUser.person (id, name, citycode) values (1, 'Mr Foo', 2);
insert into MyUser.person (id, name, citycode) values (2, 'Jane Doe', 2);
insert into MyUser.person (id, name, citycode) values (3, 'John', 1);
SELECT * FROM MyUser.person p, MyUser.CITY c where p.CITYCODE=c.CITYID;
Als erstes schreiben wir eine C# Klasse, die einer Zeile aus der Datenbanktabelle City entsprechen wird
{
public class City
{
public virtual long cityid { get; set; }
public virtual string cityname { get; set; }
}
}
Wichtig ist, dass die Klasse public ist und die Getter und Setter public virtual.
Wir legen im Projekt einen neuen Ordner „Mappings“ an und dort eine XML Datei „City.hbm.xml“
<hibernate-mapping xmlns="urn:nhibernate-mapping-2.2"
assembly="NHibernateDemo"
namespace="NHibernateDemo">
<class name="City">
<id name="cityid">
<generator class="increment" />
</id>
<property name="cityname" />
</class>
</hibernate-mapping>
In den Properties der XML Datei setzen wir Build Action auf Embedded Resource
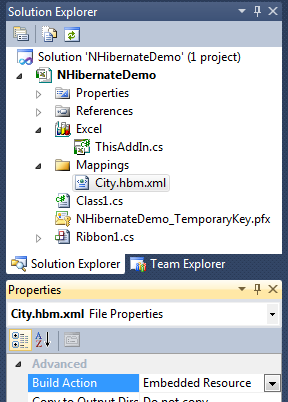
Jetzt NHibernate runterladen und irgendwo hin entpacken. Im Projekt legen wir neben den Mappings Ordner einen neuen Ordner SharedLibs an und kopieren aus dem gerade entpackten NHibernate die Dateien aus dem Ordner „Required_Bins“ in den neuen Ordner SharedLibs.
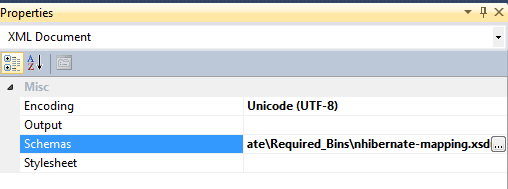
Wenn man möchte, kann man jetzt das Schema für die Mapping XML angeben. Dazu die XML öffnen, mit dem Cursor irgendwo in die Datei klicken und dann in den Properties auf die Datei nhibernate-mapping.xsd verweisen (haben wir gerade kopiert).
Jetzt konfigurieren wird NHibernate. Dazu legen wir eine Datei hibernate.cfg.xml an und setzen Copy to Output Directory auf Copy always
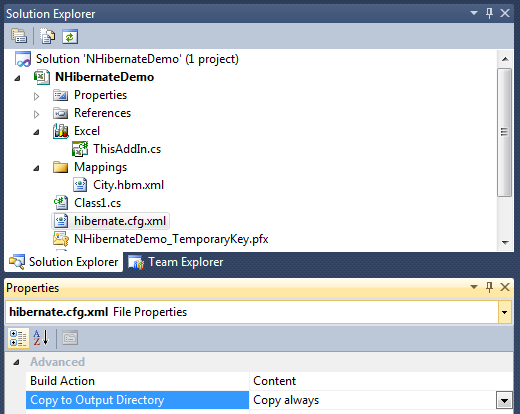
Auch hier kann man wieder auf passende Schemadefinition (nhibernate-configuration.xsd) aus der NHibernate Distribution verweisen.
<session-factory>
<property name="connection.provider">NHibernate.Connection.DriverConnectionProvider</property>
<property name="dialect">NHibernate.Dialect.Oracle10gDialect</property>
<property name="connection.driver_class">NHibernate.Driver.OracleDataClientDriver</property>
<property name="connection.connection_string">
User Id=MyUser;
Password=supersecret;
Data Source=MyDataBase;
Pooling=true;
Enlist=false;
Statement Cache Size=50;
Min Pool Size=10;
Incr Pool Size=5;
Decr Pool Size=2;
</property>
<property name="show_sql">true</property>
<!-- <property name="proxyfactory.factory_class">NHibernate.ByteCode.LinFu.ProxyFactoryFactory, NHibernate.ByteCode.LinFu</property> -->
<mapping assembly="NHibernateDemo"/>
</session-factory>
</hibernate-configuration>
Damit das funktioniert muss es in der tnsnames.ora des lokalen Oracle Clients einen entsprechenden Eintrag mit dem Namen MyDataBase geben.
Damit wir mit der Oracle Datenbank kommunizieren können, benötigen wir entsprechende Treiber. Für unsere Oracle Datenbank benutzen wir Oracle Data Provider for .NET (odp.net). Optional kann man dabei auch gleich die Oracle Developer Tools for Visual Studio mitinstallieren.
Die Oracle.DataAccess.dll über Add Reference, .NET hinzufügen

und danach für diese Referenz Copy Local auf True setzen
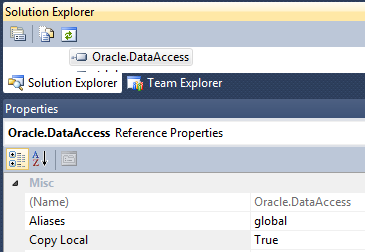
Jetzt versuchen wir mal aus der Datenbank zu lesen:
{
public class NHibernateDBStuff
{
private static NHibernate.ISessionFactory _sessionFactory;
private static NHibernate.ISessionFactory sessionFactory
{
get
{
if (_sessionFactory == null)
{
var cfg = new Configuration();
cfg.Configure();
//cfg.AddAssembly(typeof(City).Assembly);
_sessionFactory = cfg.BuildSessionFactory();
}
return _sessionFactory;
}
}
public static NHibernate.ISession getSession()
{
return sessionFactory.OpenSession();
}
}
}
var query = session.CreateQuery("from City");
var result1 = query.List();
foreach (City c in result1)
{
...
}
Jetzt bilden wir eine zweite Tabelle ab und verknüpfen diese über das NHibernate Mapping. Eine Person ist genau einer City zugeordnet, eine City ist beliebig vielen Personen zugeordnet.
using System.Text;
using System;
namespace NHibernateDemo
{
public class Person
{
public virtual long id { get; set; }
public virtual String name { get; set; }
public virtual long citycode { get; set; }
public virtual City city { get; set; }
}
}
<hibernate-mapping xmlns="urn:nhibernate-mapping-2.2"
assembly="NHibernateDemo"
namespace="NHibernateDemo">
<class name="Person">
<id name="id">
<generator class="increment" />
</id>
<property name="name" />
<property name="citycode" />
<many-to-one name="city" column="citycode"/>
</class>
</hibernate-mapping>
using System.Linq;
using System.Text;
using Iesi.Collections;
namespace NHibernateDemo
{
public class City
{
public virtual long cityid { get; set; }
public virtual string cityname { get; set; }
public virtual ISet personsInCity { get; set; }
}
}
<hibernate-mapping xmlns="urn:nhibernate-mapping-2.2"
assembly="NHibernateDemo"
namespace="NHibernateDemo">
<class name="City">
<id name="cityid">
<generator class="increment" />
</id>
<property name="cityname" />
<set lazy="true" table="Person" name="personsInCity" inverse="true" cascade="all">
<key foreign-key="citiyid" column="citycode"/>
<one-to-many class="Person" />
</set>
</class>
</hibernate-mapping>
Nicht vergessen, auf für die neue XML Datei auch Build Action zu setzen.
Jetzt kann man sowohl ein Person auslesen und dann ihre Stadt ermitteln als auch eine Stadt auslesen und dann alle Einwohner ermitteln:
var query = session.CreateQuery("from Person");
var result2 = query.List();
foreach (Person p in result2)
{
doOutput(p.name);
if (p.city != null)
{
doOutput(p.city.cityname);
}
}
query = session.CreateQuery("from City");
var result1 = query.List();
foreach (City c in result1)
{
doOutput(c.cityname);
if (c.personsInCity != null)
{
foreach (Person p in c.personsInCity)
{
doOutput(p.persons);
}
}
}
Falls folgender Fehler kommt:
+ InnerException {"Access is denied: 'NHibernateDemo.City'.":""} System.Exception {System.TypeLoadException}
Sind alle beteiligte Klassen public und alle Getter und Setter public und virtual?
SQL in Objekten speichern
Man kann auch ganz normales SQL benutzen, z.B. um Tabellen auszulesen, die nicht gemappt sind
String sqlText = "select pm.id as personID, pm.name as personName, ci.cityname as cityName from foo.person pm, foo.city ci where pm.citycode=ci.cityid";
// create a NHibernate SQL query for it
ISQLQuery sqlQuery=session.CreateSQLQuery(sqlText);
Gibt es jetzt noch eine ganz normale C# Klasse, die für jedes ausgelesen Feld einen entsprechenden Getter und Setter aufweist
{
public class PersonWithCity
{
public virtual long personID { get; set; }
public virtual String personName { get; set; }
public virtual String cityName { get; set; }
}
}
kann man das Ergebnis sogar in normale C# Objekte abspeichern lassen
String sqlText = "select pm.id as personID, pm.name as personName, ci.cityname as cityName from foo.person pm, foo.city ci where pm.citycode=ci.cityid";
// create a NHibernate SQL query for it
ISQLQuery sqlQuery=session.CreateSQLQuery(sqlText);
// assign the columns of the to be read out of the SQL statement a data type
sqlQuery.AddScalar("personID", NHibernateUtil.Int64);
sqlQuery.AddScalar("personName", NHibernateUtil.String);
sqlQuery.AddScalar("cityName", NHibernateUtil.String);
/* NHibernate can transform the output into an normal C# object
* as long as it has getters and setters for each field we read form the SQL
*/
IResultTransformer trans = Transformers.AliasToBean(typeof(PersonWithCity));
IQuery objectQuery=sqlQuery.SetResultTransformer(trans);
Unit Tests
/// This is a small demo class which implements a simple stack
/// and demonstrates object cloning in C#
/// </summary>
/// <typeparam name="MyType">What type of objects your stack contains</typeparam>
public class MyStack<MyType> : ICloneable
{
private IList<MyType> stack;
/// <summary>
/// Constructor
/// </summary>
public MyStack()
{
stack = new List<MyType>();
}
/// <summary>
/// This method is from the ICloneable interface, not very handy
/// as it returns generic objects
/// </summary>
/// <returns>A clone of this object</returns>
object ICloneable.Clone()
{
return this.Clone();
}
/// <summary>
/// This method returns a clone of this object
/// </summary>
/// <returns></returns>
public MyStack<MyType> Clone()
{
return (MyStack<MyType>)this.MemberwiseClone();
}
/// <summary>
/// Add a new element
/// </summary>
/// <param name="pNewElement">The new element</param>
public void add(MyType pNewElement)
{
stack.Add(pNewElement);
}
/// <summary>
/// returns the topmost element and removes it from stack
/// </summary>
/// <returns>The topmost object</returns>
public MyType pop()
{
int maxPos = stack.Count-1;
MyType result = stack[maxPos];
stack.RemoveAt(maxPos);
return result;
}
/// <summary>
/// The number of values which are currently in our stack
/// </summary>
/// <returns>Number of elements in stack</returns>
public int getSize()
{
return stack.Count;
}
/// <summary>
/// We override the equals method
/// </summary>
/// <param name="obj">Other object</param>
/// <returns>True if both are equal</returns>
public bool isThisAStackWithEqualElements(MyStack<MyType> pOtherStack)
{
if (this.getSize() != pOtherStack.getSize())
{
return false;
}
else
{
for (int i = 0; i < this.getSize(); i++)
{
MyType a = this.stack[i];
MyType b = pOtherStack.stack[i];
if ((a == null && b != null) || (a != null && b == null))
{
return false;
}
else if (a != null && b != null)
{
if (!a.Equals(b)) return false;
}
}
}
return true;
}
}
In Visual Studio 2010 rechts auf die Klasse klicken, Create Unit Tests ...
///This is a test class for MyStackTest and is intended
///to contain all MyStackTest Unit Tests
///</summary>
[TestClass()]
public class MyStackTest
{
private TestContext testContextInstance;
#region Additional test attributes
//
//You can use the following additional attributes as you write your tests:
//
//Use ClassInitialize to run code before running the first test in the class
//[ClassInitialize()]
//public static void MyClassInitialize(TestContext testContext)
//{
//}
//
//Use ClassCleanup to run code after all tests in a class have run
//[ClassCleanup()]
//public static void MyClassCleanup()
//{
//}
//
//Use TestInitialize to run code before running each test
//[TestInitialize()]
//public void MyTestInitialize()
//{
//}
//
//Use TestCleanup to run code after each test has run
//[TestCleanup()]
//public void MyTestCleanup()
//{
//}
//
/// <summary>
///Gets or sets the test context which provides
///information about and functionality for the current test run.
///</summary>
public TestContext TestContext
{
get
{
return testContextInstance;
}
set
{
testContextInstance = value;
}
}
#endregion
/// <summary>
///A test for MyStack`1 Constructor
///</summary>
public void MyStackConstructorTestHelper<MyType>()
{
MyStack<MyType> target = new MyStack<MyType>();
Assert.AreEqual(0, target.getSize());
}
[TestMethod()]
public void MyStackConstructorTest()
{
MyStackConstructorTestHelper<GenericParameterHelper>();
}
/// <summary>
///A test for Clone
///</summary>
public void CloneTestHelper<MyType>()
{
MyStack<MyType> original = new MyStack<MyType>();
MyStack<MyType> cloned;
cloned = original.Clone();
Assert.IsTrue(original.isThisAStackWithEqualElements(cloned));
}
[TestMethod()]
public void CloneTest()
{
CloneTestHelper<GenericParameterHelper>();
}
/// <summary>
///A test for add and pop
///</summary>
public void addTestHelper<MyType>()
{
MyStack<MyType> target = new MyStack<MyType>(); // TODO: Initialize to an appropriate value
MyType a = default(MyType); // TODO: Initialize to an appropriate value
int s_before = target.getSize();
target.add(a);
int s_while = target.getSize();
MyType b=target.pop();
int s_after = target.getSize();
Assert.AreEqual(a, b);
Assert.AreEqual(s_before, s_after);
Assert.AreEqual(s_after, s_while - 1);
}
[TestMethod()]
public void addTest()
{
addTestHelper<GenericParameterHelper>();
}
[TestMethod()]
public void popTest()
{
addTestHelper<GenericParameterHelper>();
}
/// <summary>
///A test for isThisAStackWithEqualElements
///</summary>
public void isThisAStackWithEqualElementsTestHelper<MyType>()
{
MyStack<MyType> a = new MyStack<MyType>();
MyStack<MyType> b = new MyStack<MyType>();
// empty stacks should be equal
Assert.AreEqual(a.GetHashCode(), b.GetHashCode());
MyType x = default(MyType);
a.add(x);
b.add(x);
Assert.AreEqual(a.GetHashCode(), b.GetHashCode());
b.add(x);
a.add(x);
Assert.AreEqual(a.GetHashCode(), b.GetHashCode());
a.pop();
b.pop();
Assert.AreEqual(a.GetHashCode(), b.GetHashCode());
b.pop();
a.pop();
Assert.AreEqual(a.GetHashCode(), b.GetHashCode());
}
[TestMethod()]
public void isThisAStackWithEqualElementsTest()
{
isThisAStackWithEqualElementsTestHelper<GenericParameterHelper>();
}
}
Logging
Im Dateisystem im Ordner des Projekt (falls noch nicht vorhanden) einen Ordner für Libs anlegen. Dort die log4net.dll ablegen, die man auf log4net findet. Im Solution Explorer Rechtsklick auf References und dann Add Reference. Dort Browse und die dll auswählen. Danach im Solution Explorer unter References überprüfen dass die dll aufgelistet ist und die Option Copy Local auf True steht. Zur Konfiguration in der Datei app.config im Bereich configSections das einfügen
Und nach configSections das hier um in eine Datei und auf die Konsole zu loggen.
<root>
<!-- This is the minimum loglevel for our loggers, you can reduce it even more in the loggers itself via a filter -->
<level value="DEBUG" />
<!-- A file logger and a console logger -->
<appender-ref ref="LogFileAppender" />
<appender-ref ref="ConsoleAppender" />
</root>
<!-- The file logger -->
<appender name="LogFileAppender" type="log4net.Appender.RollingFileAppender" >
<!-- Where to log to -->
<param name="File" value="c: emplog-file.txt" />
<param name="AppendToFile" value="true" />
<rollingStyle value="Size" />
<maxSizeRollBackups value="10" />
<maximumFileSize value="1000MB" />
<staticLogFileName value="true" />
<layout type="log4net.Layout.PatternLayout">
<!-- What to log in each line -->
<param name="ConversionPattern" value="%date %-5level %logger - %message%newline" />
</layout>
</appender>
<!-- A logger to the console-->
<appender name="ConsoleAppender" type="log4net.Appender.ConsoleAppender" >
<!-- We reduce the log level even more for the console -->
<filter type="log4net.Filter.LevelRangeFilter">
<levelMin value="INFO" />
</filter>
<layout type="log4net.Layout.PatternLayout">
<param name="ConversionPattern" value="%date %-5level %logger - %message%newline" />
</layout>
</appender>
</log4net>
Im Code muss jetzt einmalig die Konfigurationsdatei verarbeitet werden
...
log4net.Config.XmlConfigurator.Configure();
Jetzt kann man im Projekt ein Objekt beziehen, um zu loggen:
ILog logger = LogManager.GetLogger(typeof(my_class_with_name_foo));
logger.Error("Oh oh!");
Falls das folgenden Fehler auslöst
Ist vermutlich für das Projekt als Target framework.NET Framework 4 Client Profile eingestellt. Das ist eine abgespeckte Version, die nicht ausreicht, um log4net zu benutzen. Mit
funktioniert es dann.